Virtual Keys
Track Spend, and control model access via virtual keys for the proxy
Setup
Requirements:
- Need a postgres database (e.g. Supabase, Neon, etc)
- Set
DATABASE_URL=postgresql://<user>:<password>@<host>:<port>/<dbname>in your env - Set a
master key, this is your Proxy Admin key - you can use this to create other keys (🚨 must start withsk-).- ** Set on config.yaml** set your master key under
general_settings:master_key, example below - ** Set env variable** set
LITELLM_MASTER_KEY
- ** Set on config.yaml** set your master key under
(the proxy Dockerfile checks if the DATABASE_URL is set and then initializes the DB connection)
export DATABASE_URL=postgresql://<user>:<password>@<host>:<port>/<dbname>
You can then generate keys by hitting the /key/generate endpoint.
Quick Start - Generate a Key
Step 1: Save postgres db url
model_list:
  - model_name: gpt-4
    litellm_params:
        model: ollama/llama2
  - model_name: gpt-3.5-turbo
    litellm_params:
        model: ollama/llama2

general_settings:
  master_key: sk-1234
  database_url: "postgresql://<user>:<password>@<host>:<port>/<dbname>" # 👈 KEY CHANGE
Step 2: Start litellm
litellm --config /path/to/config.yaml
Step 3: Generate keys
curl 'http://0.0.0.0:4000/key/generate' \
--header 'Authorization: Bearer <your-master-key>' \
--header 'Content-Type: application/json' \
--data-raw '{"models": ["gpt-3.5-turbo", "gpt-4"], "metadata": {"user": "ishaan@berri.ai"}}'
Spend Tracking
Get spend per:
- key - via
/key/infoSwagger - user - via
/user/infoSwagger - team - via
/team/infoSwagger - ⏳ end-users - via
/end_user/info- Comment on this issue for end-user cost tracking
How is it calculated?
The cost per model is stored here and calculated by the completion_cost function.
How is it tracking?
Spend is automatically tracked for the key in the "LiteLLM_VerificationTokenTable". If the key has an attached 'user_id' or 'team_id', the spend for that user is tracked in the "LiteLLM_UserTable", and team in the "LiteLLM_TeamTable".
- Key Spend
- User Spend
- Team Spend
You can get spend for a key by using the /key/info endpoint.
curl 'http://0.0.0.0:4000/key/info?key=<user-key>' \
     -X GET \
     -H 'Authorization: Bearer <your-master-key>'
This is automatically updated (in USD) when calls are made to /completions, /chat/completions, /embeddings using litellm's completion_cost() function. See Code.
Sample response
{
    "key": "sk-tXL0wt5-lOOVK9sfY2UacA",
    "info": {
        "token": "sk-tXL0wt5-lOOVK9sfY2UacA",
        "spend": 0.0001065, # 👈 SPEND
        "expires": "2023-11-24T23:19:11.131000Z",
        "models": [
            "gpt-3.5-turbo",
            "gpt-4",
            "claude-2"
        ],
        "aliases": {
            "mistral-7b": "gpt-3.5-turbo"
        },
        "config": {}
    }
}
1. Create a user
curl --location 'http://localhost:4000/user/new' \
--header 'Authorization: Bearer <your-master-key>' \
--header 'Content-Type: application/json' \
--data-raw '{user_email: "krrish@berri.ai"}'
Expected Response
{
    ...
    "expires": "2023-12-22T09:53:13.861000Z",
    "user_id": "my-unique-id", # 👈 unique id
    "max_budget": 0.0
}
2. Create a key for that user
curl 'http://0.0.0.0:4000/key/generate' \
--header 'Authorization: Bearer <your-master-key>' \
--header 'Content-Type: application/json' \
--data-raw '{"models": ["gpt-3.5-turbo", "gpt-4"], "user_id": "my-unique-id"}'
Returns a key - sk-....
3. See spend for user
curl 'http://0.0.0.0:4000/user/info?user_id=my-unique-id' \
     -X GET \
     -H 'Authorization: Bearer <your-master-key>'
Expected Response
{
  ...
  "spend": 0 # 👈 SPEND
}
Use teams, if you want keys to be owned by multiple people (e.g. for a production app).
1. Create a team
curl --location 'http://localhost:4000/team/new' \
--header 'Authorization: Bearer <your-master-key>' \
--header 'Content-Type: application/json' \
--data-raw '{"team_alias": "my-awesome-team"}'
Expected Response
{
    ...
    "expires": "2023-12-22T09:53:13.861000Z",
    "team_id": "my-unique-id", # 👈 unique id
    "max_budget": 0.0
}
2. Create a key for that team
curl 'http://0.0.0.0:4000/key/generate' \
--header 'Authorization: Bearer <your-master-key>' \
--header 'Content-Type: application/json' \
--data-raw '{"models": ["gpt-3.5-turbo", "gpt-4"], "team_id": "my-unique-id"}'
Returns a key - sk-....
3. See spend for team
curl 'http://0.0.0.0:4000/team/info?team_id=my-unique-id' \
     -X GET \
     -H 'Authorization: Bearer <your-master-key>'
Expected Response
{
  ...
  "spend": 0 # 👈 SPEND
}
Model Aliases
If a user is expected to use a given model (i.e. gpt3-5), and you want to:
- try to upgrade the request (i.e. GPT4)
- or downgrade it (i.e. Mistral)
Here's how you can do that:
Step 1: Create a model group in config.yaml (save model name, api keys, etc.)
model_list:
  - model_name: my-free-tier
    litellm_params:
        model: huggingface/HuggingFaceH4/zephyr-7b-beta
        api_base: http://0.0.0.0:8001
  - model_name: my-free-tier
    litellm_params:
        model: huggingface/HuggingFaceH4/zephyr-7b-beta
        api_base: http://0.0.0.0:8002
  - model_name: my-free-tier
    litellm_params:
        model: huggingface/HuggingFaceH4/zephyr-7b-beta
        api_base: http://0.0.0.0:8003
  - model_name: my-paid-tier
    litellm_params:
        model: gpt-4
        api_key: my-api-key
Step 2: Generate a key
curl -X POST "https://0.0.0.0:4000/key/generate" \
-H "Authorization: Bearer <your-master-key>" \
-H "Content-Type: application/json" \
-d '{
	"models": ["my-free-tier"],
	"aliases": {"gpt-3.5-turbo": "my-free-tier"}, # 👈 KEY CHANGE
	"duration": "30min"
}'
- How to upgrade / downgrade request? Change the alias mapping
Step 3: Test the key
curl -X POST "https://0.0.0.0:4000/key/generate" \
-H "Authorization: Bearer <user-key>" \
-H "Content-Type: application/json" \
-d '{
    "model": "gpt-3.5-turbo",
    "messages": [
        {
            "role": "user",
            "content": "this is a test request, write a short poem"
        }
    ]
}'
Advanced
Pass LiteLLM Key in custom header
Use this to make LiteLLM proxy look for the virtual key in a custom header instead of the default "Authorization" header
Step 1 Define litellm_key_header_name name on litellm config.yaml
model_list:
  - model_name: fake-openai-endpoint
    litellm_params:
      model: openai/fake
      api_key: fake-key
      api_base: https://exampleopenaiendpoint-production.up.railway.app/

general_settings:
  master_key: sk-1234
  litellm_key_header_name: "X-Litellm-Key" # 👈 Key Change
Step 2 Test it
In this request, litellm will use the Virtual key in the X-Litellm-Key header
- curl
- OpenAI Python SDK
curl http://localhost:4000/v1/chat/completions \
  -H "Content-Type: application/json" \
  -H "X-Litellm-Key: Bearer sk-1234" \
  -H "Authorization: Bearer bad-key" \
  -d '{
    "model": "fake-openai-endpoint",
    "messages": [
      {"role": "user", "content": "Hello, Claude gm!"}
    ]
  }'
Expected Response
Expect to see a successful response from the litellm proxy since the key passed in X-Litellm-Key is valid
{"id":"chatcmpl-f9b2b79a7c30477ab93cd0e717d1773e","choices":[{"finish_reason":"stop","index":0,"message":{"content":"\n\nHello there, how may I assist you today?","role":"assistant","tool_calls":null,"function_call":null}}],"created":1677652288,"model":"gpt-3.5-turbo-0125","object":"chat.completion","system_fingerprint":"fp_44709d6fcb","usage":{"completion_tokens":12,"prompt_tokens":9,"total_tokens":21}
client = openai.OpenAI(
    api_key="not-used",
    base_url="https://api-gateway-url.com/llmservc/api/litellmp",
    default_headers={
        "Authorization": f"Bearer {API_GATEWAY_TOKEN}", # (optional) For your API Gateway
        "X-Litellm-Key": f"Bearer sk-1234"              # For LiteLLM Proxy
    }
)
Enable/Disable Virtual Keys
Disable Keys
curl -L -X POST 'http://0.0.0.0:4000/key/block' \
-H 'Authorization: Bearer LITELLM_MASTER_KEY' \
-H 'Content-Type: application/json' \
-d '{"key": "KEY-TO-BLOCK"}'
Expected Response:
{
  ...
  "blocked": true
}
Enable Keys
curl -L -X POST 'http://0.0.0.0:4000/key/unblock' \
-H 'Authorization: Bearer LITELLM_MASTER_KEY' \
-H 'Content-Type: application/json' \
-d '{"key": "KEY-TO-UNBLOCK"}'
{
  ...
  "blocked": false
}
Custom /key/generate
If you need to add custom logic before generating a Proxy API Key (Example Validating team_id)
1. Write a custom custom_generate_key_fn
The input to the custom_generate_key_fn function is a single parameter: data (Type: GenerateKeyRequest)
The output of your custom_generate_key_fn should be a dictionary with the following structure
{
    "decision": False,
    "message": "This violates LiteLLM Proxy Rules. No team id provided.",
}
-
decision (Type: bool): A boolean value indicating whether the key generation is allowed (True) or not (False).
-
message (Type: str, Optional): An optional message providing additional information about the decision. This field is included when the decision is False.
async def custom_generate_key_fn(data: GenerateKeyRequest)-> dict:
        """
        Asynchronous function for generating a key based on the input data.

        Args:
            data (GenerateKeyRequest): The input data for key generation.

        Returns:
            dict: A dictionary containing the decision and an optional message.
            {
                "decision": False,
                "message": "This violates LiteLLM Proxy Rules. No team id provided.",
            }
        """

        # decide if a key should be generated or not
        print("using custom auth function!")
        data_json = data.json()  # type: ignore

        # Unpacking variables
        team_id = data_json.get("team_id")
        duration = data_json.get("duration")
        models = data_json.get("models")
        aliases = data_json.get("aliases")
        config = data_json.get("config")
        spend = data_json.get("spend")
        user_id = data_json.get("user_id")
        max_parallel_requests = data_json.get("max_parallel_requests")
        metadata = data_json.get("metadata")
        tpm_limit = data_json.get("tpm_limit")
        rpm_limit = data_json.get("rpm_limit")

        if team_id is not None and team_id == "litellm-core-infra@gmail.com":
            # only team_id="litellm-core-infra@gmail.com" can make keys
            return {
                "decision": True,
            }
        else:
            print("Failed custom auth")
            return {
                "decision": False,
                "message": "This violates LiteLLM Proxy Rules. No team id provided.",
            }
2. Pass the filepath (relative to the config.yaml)
Pass the filepath to the config.yaml
e.g. if they're both in the same dir - ./config.yaml and ./custom_auth.py, this is what it looks like:
model_list:
  - model_name: "openai-model"
    litellm_params:
      model: "gpt-3.5-turbo"

litellm_settings:
  drop_params: True
  set_verbose: True

general_settings:
  custom_key_generate: custom_auth.custom_generate_key_fn
Upperbound /key/generate params
Use this, if you need to set default upperbounds for max_budget, budget_duration or any key/generate param per key.
Set litellm_settings:upperbound_key_generate_params:
litellm_settings:
  upperbound_key_generate_params:
    max_budget: 100 # Optional[float], optional): upperbound of $100, for all /key/generate requests
    budget_duration: "10d" # Optional[str], optional): upperbound of 10 days for budget_duration values
    duration: "30d" # Optional[str], optional): upperbound of 30 days for all /key/generate requests
    max_parallel_requests: 1000 # (Optional[int], optional): Max number of requests that can be made in parallel. Defaults to None.
    tpm_limit: 1000 #(Optional[int], optional): Tpm limit. Defaults to None.
    rpm_limit: 1000 #(Optional[int], optional): Rpm limit. Defaults to None.
** Expected Behavior **
- Send a
/key/generaterequest withmax_budget=200 - Key will be created with
max_budget=100since 100 is the upper bound
Default /key/generate params
Use this, if you need to control the default max_budget or any key/generate param per key.
When a /key/generate request does not specify max_budget, it will use the max_budget specified in default_key_generate_params
Set litellm_settings:default_key_generate_params:
litellm_settings:
  default_key_generate_params:
    max_budget: 1.5000
    models: ["azure-gpt-3.5"]
    duration:     # blank means `null`
    metadata: {"setting":"default"}
    team_id: "core-infra"
✨ Key Rotations
Rotate an existing API Key, while optionally updating its parameters.
curl 'http://localhost:4000/key/sk-1234/regenerate' \
  -X POST \
  -H 'Authorization: Bearer sk-1234' \
  -H 'Content-Type: application/json' \
  -d '{
    "max_budget": 100,
    "metadata": {
      "team": "core-infra"
    },
    "models": [
      "gpt-4",
      "gpt-3.5-turbo"
    ]
  }'
Read More
Scheduled Key Rotations
LiteLLM can rotate virtual keys automatically based on time intervals you define.
Prerequisites
- Database connection required - Key rotation requires a connected database to track rotation schedules
- Enable the rotation worker - Set environment variable
LITELLM_KEY_ROTATION_ENABLED=true - Configure check interval - Optionally set
LITELLM_KEY_ROTATION_CHECK_INTERVAL_SECONDS(default: 86400 seconds / 24 hours)
How it works
- When creating a virtual key, set
auto_rotate: trueandrotation_interval(duration string) - LiteLLM calculates the next rotation time as
now + rotation_intervaland stores it in the database - A background job periodically checks for keys where the rotation time has passed
- When a key is due for rotation, LiteLLM automatically regenerates it and invalidates the old key string
- The new rotation time is calculated and the cycle continues
Create a key with auto rotation
API
curl 'http://0.0.0.0:4000/key/generate' \
  -H 'Authorization: Bearer <your-master-key>' \
  -H 'Content-Type: application/json' \
  -d '{
        "models": ["gpt-4o"],
        "auto_rotate": true,
        "rotation_interval": "30d"
      }'
LiteLLM UI
On the LiteLLM UI, Navigate to the Keys page and click on Generate Key > Key Lifecycle > Enable Auto Rotation

Valid rotation_interval formats:
"30s"- 30 seconds"30m"- 30 minutes"30h"- 30 hours"30d"- 30 days"90d"- 90 days
Update existing key to enable rotation
API
curl 'http://0.0.0.0:4000/key/update' \
  -H 'Authorization: Bearer <your-master-key>' \
  -H 'Content-Type: application/json' \
  -d '{
        "key": "sk-existing-key",
        "auto_rotate": true,
        "rotation_interval": "90d"
      }'
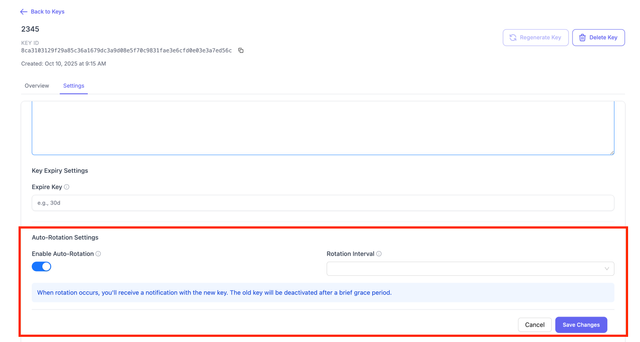
LiteLLM UI
On the LiteLLM UI, Navigate to the Keys page. Select the key you want to update and click on Edit Settings > Auto-Rotation Settings
Environment variables
Set these environment variables when starting the proxy:
| Variable | Description | Default |
|---|---|---|
LITELLM_KEY_ROTATION_ENABLED | Enable the rotation worker | false |
LITELLM_KEY_ROTATION_CHECK_INTERVAL_SECONDS | How often to scan for keys to rotate (in seconds) | 86400 (24 hours) |
Example:
export LITELLM_KEY_ROTATION_ENABLED=true
export LITELLM_KEY_ROTATION_CHECK_INTERVAL_SECONDS=3600  # Check every hour

litellm --config config.yaml
Temporary Budget Increase
Use the /key/update endpoint to increase the budget of an existing key.
curl -L -X POST 'http://localhost:4000/key/update' \
-H 'Authorization: Bearer sk-1234' \
-H 'Content-Type: application/json' \
-d '{"key": "sk-b3Z3Lqdb_detHXSUp4ol4Q", "temp_budget_increase": 100, "temp_budget_expiry": "10d"}'
Restricting Key Generation
Use this to control who can generate keys. Useful when letting others create keys on the UI.
litellm_settings:
  key_generation_settings:
    team_key_generation:
      allowed_team_member_roles: ["admin"]
      required_params: ["tags"] # require team admins to set tags for cost-tracking when generating a team key
    personal_key_generation: # maps to 'Default Team' on UI
      allowed_user_roles: ["proxy_admin"]
Spec
key_generation_settings: Optional[StandardKeyGenerationConfig] = None
Types
class StandardKeyGenerationConfig(TypedDict, total=False):
    team_key_generation: TeamUIKeyGenerationConfig
    personal_key_generation: PersonalUIKeyGenerationConfig

class TeamUIKeyGenerationConfig(TypedDict):
    allowed_team_member_roles: List[str] # either 'user' or 'admin'
    required_params: List[str] # require params on `/key/generate` to be set if a team key (team_id in request) is being generated


class PersonalUIKeyGenerationConfig(TypedDict):
    allowed_user_roles: List[LitellmUserRoles]
    required_params: List[str] # require params on `/key/generate` to be set if a personal key (no team_id in request) is being generated


class LitellmUserRoles(str, enum.Enum):
    """
    Admin Roles:
    PROXY_ADMIN: admin over the platform
    PROXY_ADMIN_VIEW_ONLY: can login, view all own keys, view all spend
    ORG_ADMIN: admin over a specific organization, can create teams, users only within their organization

    Internal User Roles:
    INTERNAL_USER: can login, view/create/delete their own keys, view their spend
    INTERNAL_USER_VIEW_ONLY: can login, view their own keys, view their own spend


    Team Roles:
    TEAM: used for JWT auth


    Customer Roles:
    CUSTOMER: External users -> these are customers

    """

    # Admin Roles
    PROXY_ADMIN = "proxy_admin"
    PROXY_ADMIN_VIEW_ONLY = "proxy_admin_viewer"

    # Organization admins
    ORG_ADMIN = "org_admin"

    # Internal User Roles
    INTERNAL_USER = "internal_user"
    INTERNAL_USER_VIEW_ONLY = "internal_user_viewer"

    # Team Roles
    TEAM = "team"

    # Customer Roles - External users of proxy
    CUSTOMER = "customer"
Next Steps - Set Budgets, Rate Limits per Virtual Key
Follow this doc to set budgets, rate limiters per virtual key with LiteLLM